How to Cut Down a Putter
 Standard putter length is 35 inches, but you may want to cut down a putter if you're shorter than the average golfer or if you want your shoulders and eyes to be more "over the ball" rather than to the side of it.
People who follow Dave Pelz's putting philosophy of creating a straight-back-straight through stroke often prefer a shorter putter. For putter length tables, click here.
The process you use to cut down a putter is a fairly straightforward process. It's something you can do yourself with minimal tools or skill, and it will save you money because you won't have to pay a professional or club repair shop to do it for you.
There are just a couple of safety considerations to take into account (please read these instructions carefully, especially the parts in bold), but otherwise you need no particular skills to shorten a putter yourself:
Here's the equipment you'll need to cut down a putter
A utility knife
About 30fl oz (100ml) of solvent

Double sided grip tape (usually supplied by grip retailer)

A cloth

A marker pen

A metal pipe cutter

A bucket

A new putter grip
How to do it...
Step 1: Cut off the old grip:
 Before you can start to think about how to cut down a putter, you have to remove the old grip. Using a utility knife start at the bottom of the grip and cut straight through, always moving the knife away from you. The safest way to do this is in a vice using a rubber shaft grip.
Step 2: Clean the area of the shaft under the grip:
 Scrape or pull away all the old double-sided tape from the grip area. If you are going to use the knife again, make sure you move the blade away from you.
Step 3: Wipe the shaft totally clean:
 Before you cut down a putter, you need to make sure the whole of the shaft is clean. Put some solvent on the cloth and wipe the remaining bits of tape and adhesive away. The shaft should be totally clean before moving on.
Step 4: Cut the shaft to the required length:
 Measure the length of shaft you want and mark that point with the marker pen. To allow for the extra length added by the grip, cut the shaft using the pipe cutter at a point 1/3 inch (0.75cm) shorter than the point you have marked off.
 The pipe cutter works by clamping the shaft against a blade which scores and eventually cuts the shaft as you turn the cutter around it. Right from the start tighten it nearly as much as you can and keep rotating the cutter until the excess piece of shaft breaks off completely.
Step 5: Wind new tape around the shaft:
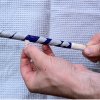
 Grip retailers normally send a length of special double sided tape with each grip.
 For Narrow (1 inch) Tape: Carefully wind the tape down the grip in a spiral shape. Make sure that the tape is evenly spaced and that it doesn't overlap. For regular grip thickness, leave a gap between each wind of tape, as in the picture.
Tuck the excess tape into the end of the shaft to seal it up.
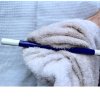
For Wide (3-4 inches) Tape: If you're using this type of tape, stick a single length vertically onto the shaft and fold it round, so that the shaft is entirely covered.
Step 6: Slip the grip on:
 Firstly remove the back side of the double sided tape wrapped round the shaft.
 Then take the new grip and pour some solvent into it, holding your finger over the hole in the butt end to stop it leaking out. The solvent allows the grip to slip over the double sided tape and activates the adhesive in some tapes.
 Next, with a finger over the holes at both ends of the grip, turn the grip this way and that, and then upside down to ensure that all areas of the inside of the grip are well washed with solvent.
With the bucket underneath to catch the excess, tip the solvent from the grip out onto the double sided tape which covers the shaft.
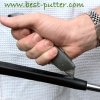
 While it is still wet, line up the flat front side of the putter so that it's roughly at right angles to the putter face and slip the grip over the shaft.
 There is a knack to doing this - you have to firm and fairly fast, and remember to push with both hands - putting the toe end of the putter against a wall will help.
(If you're really struggling you probably haven't got enough solvent on the double sided tape, or on the inside of the grip).
 Make sure the grip is pushed fully onto the shaft by holding the putter head and putting the butt end of the grip on the ground. Push down firmly to ensure the grip is as far onto the putter shaft as possible.
No point in trying to cut down a putter if the grip's not pushed all the way onto the shaft!
Final Step: Ensure grip is properly aligned:
 Put the putter the right way up again and look down the flat front surface of the grip to check the alignment. If the face of the putter appears not to be at right angles to the front of the grip, move it carefully round to the right or left and then check again. Repeat until you're happy with the alignment.
 Also, be sure to check that the grip is straight on the shaft down its entire length and not twisted. Then, you're done - you've cut down a putter for the first time!
The drying time for a putter grip in warm weather is about 4 hours.
 |
Return to the Best-Putter.com homepage
